Back in September 2018 Gavin contacted us about wanting a suitable page turner pedal for use at the organ. Unfortunately, there was really nothing available off-the-shelf. He was willing to do a bit of soldering and carpentry so I suggested the AirTurn BT200 was a suitable “donor” pedal for his project. Gavin has been busy and this post, written by him, explains the project. Gavin started working life as a BBC Sound Engineer then after 20yrs changed tack to be a music teacher. Now retired early. He has played the organ since he was 11 and got his ABRSM performance diploma in 2013.
25 Sept 2019 – An update to this post has been added at the end…
15th November – Update and new photos – The Mk III pedal added at end…
This is his story…
Background
I was introduced to the delights and of Power Music Professional last year during a masterclass with my organ teacher – Kevin Bowyer.
I could immediately see that for me as an organist who plays in a variety of churches such a system would solve many problems.
Page Turning
No more having to worry about turning paper pages. No more having to photocopy page turns, sellotaping four or five sides of A4 together and hoping the console music stand would be wide enough. No need to worry about whether someone would open a door yards away in a draughty church and a gust of wind would blow your score back several pages, and (most disastrous of all!) no worrying about reaching up to do a quick critical page turn during a performance only to overdo it slightly and have the whole lot fall forward onto the keys, into your lap and down onto the pedals. Not to mention worrying about a page turner who’d promised to be there but didn’t show up.
Paper Free
No more piles of heavy hymnbooks or armfuls of music. I play in at least 8 different churches and each one has its own hymn book. With this system I could scan and download all the hymn books and have them available on one screen rather than wrestling with heavy books.
Lighting
As the display was a screen and backlit there would be no issues with regard to the music stand lighting on the console. I’ve often found such lighting is poor and sometimes there actually isn’t a specific light for the music – you have to rely on the ambient lighting in the church which is never satisfactory.
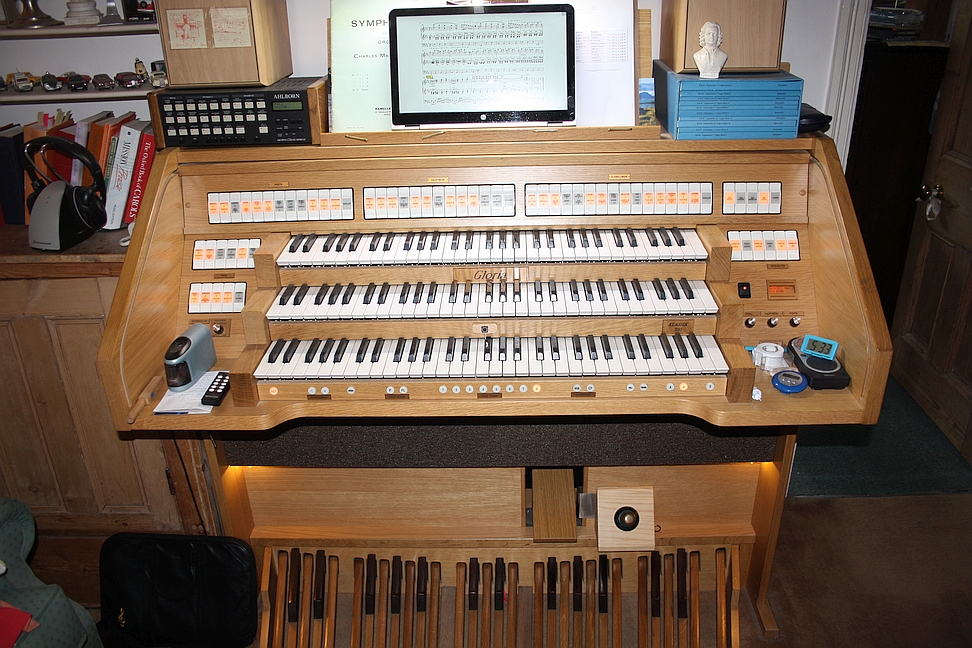
I bought the programme and installed it on my newly-purchased touch-screen laptop.
However…..
I soon discovered however that for an organist it would be really useful to be able to turn pages using the feet, so I began to look into that. There were various devices available but none of them were suited to organists – or not this organist anyway.
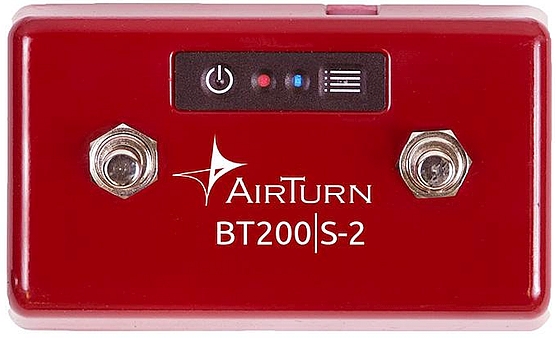
I was intrigued by the AirTurn pedal (not least because it was wireless) but when I put it on the console the switches were too small and too close together to be operated accurately by the foot at a distance. Because of this there was too much possibility of pushing the wrong switch and go back a page rather than going on.
Now, a bit of explanation here – the organ is a complex instrument and changing the stops while you’re playing can be quite complicated. Over the years, organ builders have come up with various devices to make this a little easier and one of these is the “Combination Piston”. These are small pistons (or push switches) located just under the manuals (keyboards) which you can operate using your thumb or fingers. They can be programmed to select groups (or combinations) of stops as required and this enables you to continue playing without having to reach out at arm’s length and pull out (or push in) fistfuls of stops by hand. Neat.
There are also duplicates of these pistons which you operate using your feet and they are positioned near the bottom of the console just above the pedalboard. These foot-operated buttons however are quite large. They need to be, because compared to delicate fingers a foot is quite a crude device. It’s also much stronger than the fingers so any mechanism designed to be used by the feet needs to be bigger, heavier and require more operational pressure than anything finger-operated – in the same way that organ pedals are larger and need more effort to operate them than the keys on the keyboards.
As far as I could make out, the foot-operated devices available were intended for players who didn’t really use their feet much during performances and who could cover the switch with a foot and gently push it when necessary. Perfectly adequate for them, but not usable for an organist. You need both feet free to move around the pedalboard and you’re lucky sometimes if you have as much as a semiquaver’s rest to jab at the combination piston required. It can take some practice but in the same way that you don’t look at your feet when using the pedals (I don’t anyway!) you get used to where the various foot pistons are located.
The answer for me then was obvious – I needed a foot-operated page turner that utilised a foot piston similar to one that you would find on a standard console. I couldn’t find one on the market so I set out to make one.
Design and build
I’d like to say I drew up plans and followed them to the letter but that would be untrue. This was all done by trial-and-error.
It needed to be portable so I could take it with me and set it up on any console. Adapting the AirTurn pedal seemed the obvious choice.
I do a lot of carpentry so making it out of wood was an easy decision, and I’d just bought an old organ console off eBay for 99p which had nine foot pistons on it and I only needed one.
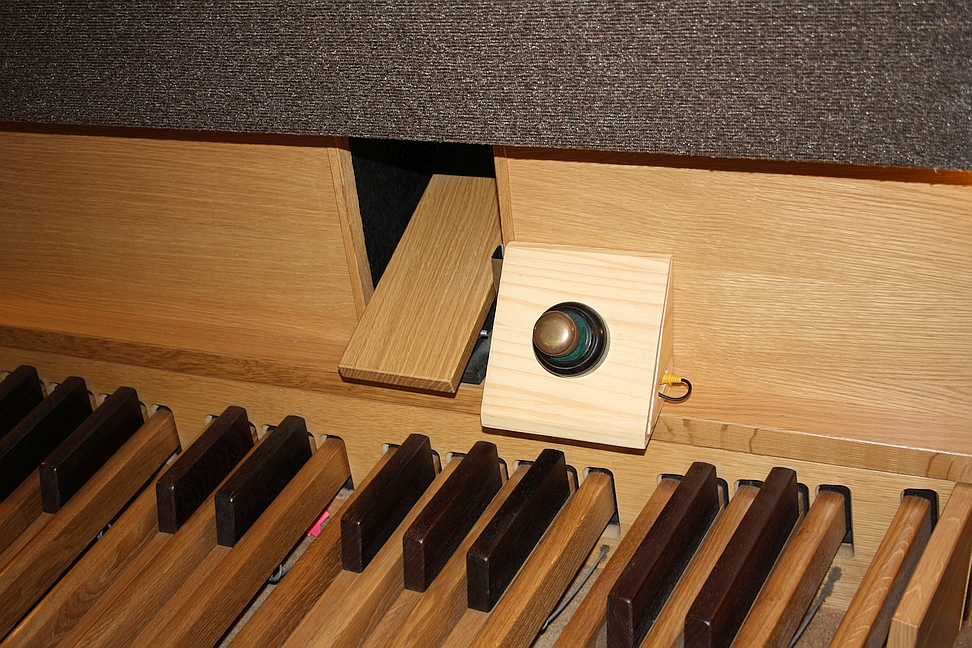
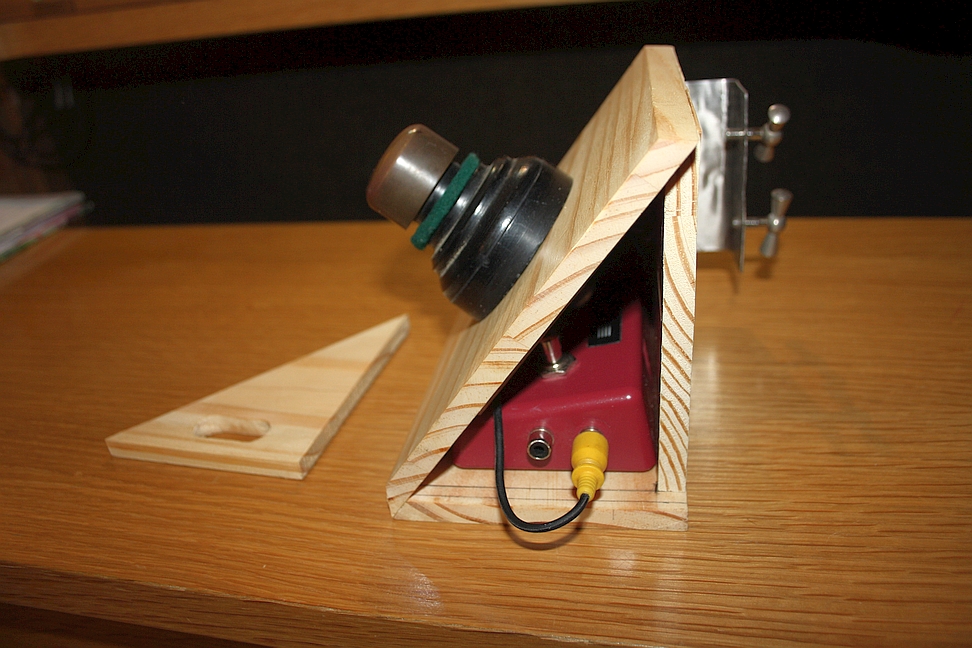
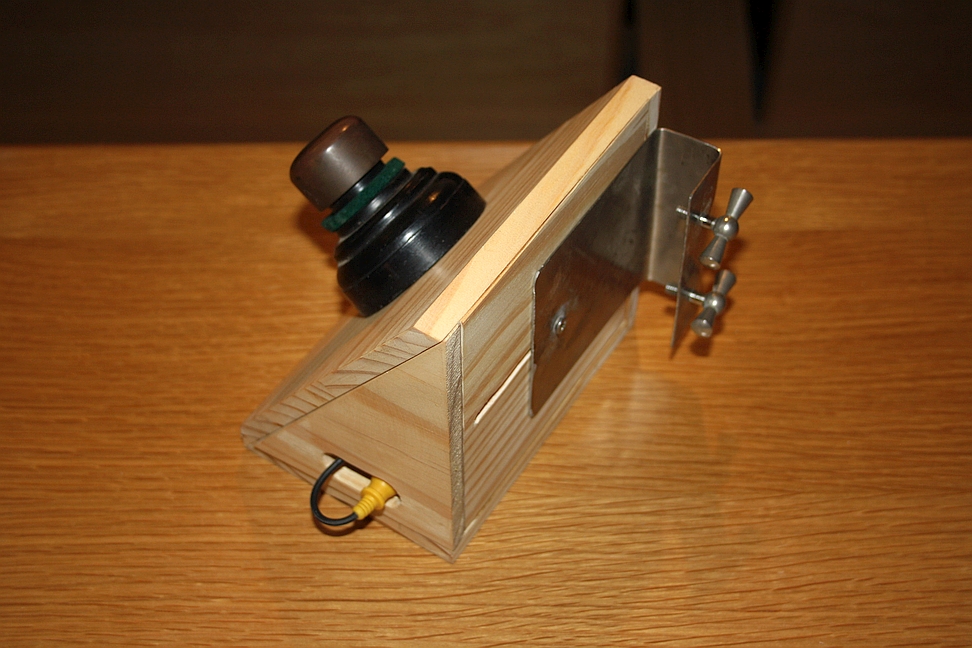
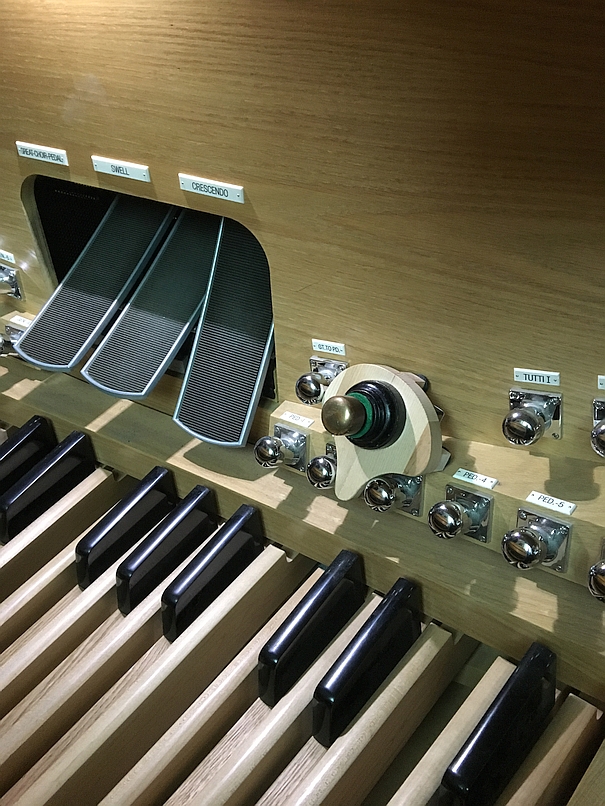
The box housing the switch and AirTurn would have to be at an angle, as were the usual pedal pistons. I tried 45 degrees but this seemed a bit steep so I settled on 40. The size of the box was dictated by the need for it to house both the AirTurn pedal and the footswitch.
The finished box had to fit securely on any console I was visiting. I thought the one thing you could count on most consoles having was the cut-out to house the swell pedal, so I set about designing and building a metal clamp which would enable you to fit the box on one side or the other of that housing.
As a matter of principle all the wood I use is recycled – I’ve been doing woodwork for a number of years now and I’m proud to say I have YET to buy any wood for a project. Pallets are a good source – you’d be surprised how nice even such wood can turn out once it’s been planed and sanded!
I’ve used 8mm solid pine from panels off an old wardrobe a neighbour threw out. I would have liked to use oak but as it’s a prototype (and much of it would probably go to waste during the process) I reasoned pine would do for now.
For the clamp I used a small piece of sheet stainless steel I had left over in the workshop. In order to get a square bracket shape I needed a square metal former to hammer it over and the easiest way to achieve this was to remove the sliding jaw of my bench vice which then left the other metal jaw bolted to the workbench – perfect. I guessed the depth for the clamp bracket would need to be about 20mm which should be more than enough to fit round the thickness of wood used on most consoles.
I found two long bolts with T-shaped knobs on (see picture). I cut these down to about 25mm in length, tapped a thread on the ends and made two reciprocal threaded holes in the steel plate. These would be the clamp screws.
The steel bracket then had a single nut and bolt fitted which would go into the long slit sawn in the back of the wooden box so the whole thing could slide a few inches right or left if required.
I’d already adapted the AirTurn device so that it could be operated using an external switch by fitting it with two phono plugs soldered internally to one of the existing foot switches on the device.
I toyed with the idea of using the metal plunger on the footswitch to press down on the AirTurn switch, but dismissed this. It would have required the absolutely critical positioning of one box inside another and some means of fixing the AirTurn box so it couldn’t move. This was starting to sound over-complicated to me and it came with a significant disadvantage over merely using it as an electrical switch, which was that mechanical things wear out quicker than electrical ones. As I’d already modified the AirTurn (see above) an electrical connection was a no-brainer.
There is a hole in the side panel of the wooden box so that another device (possibly a thumb operated switch) could plugged in as well. The side panel is also removable so that if needed the AirTurn can be removed, used as originally intended and be charged up when necessary.
Conclusion
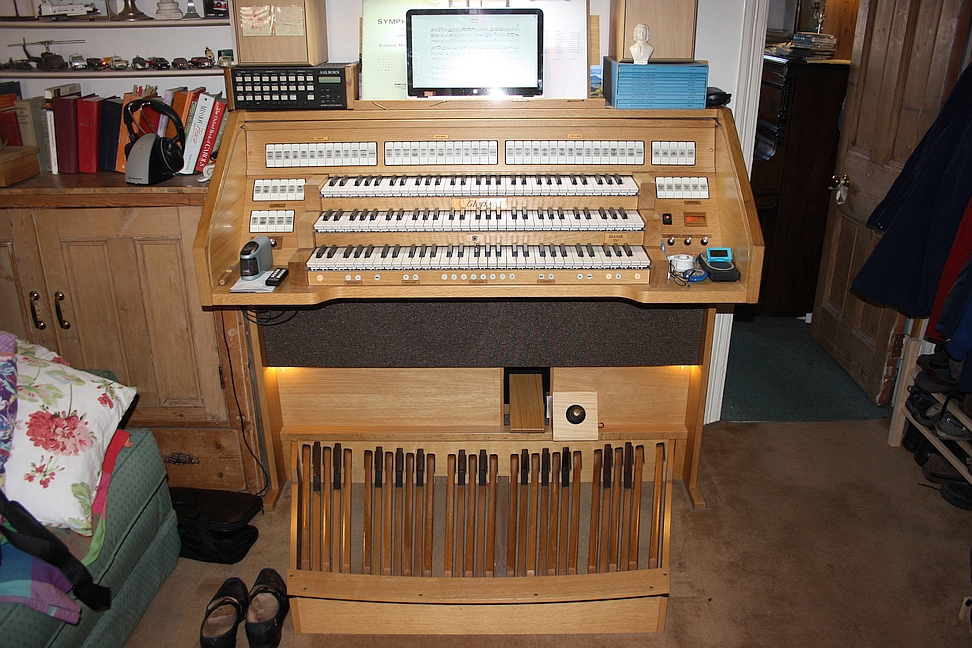
It works!! If you look at the picture of the finished and fitted device, it’s as low as it can go but it doesn’t need to be. If necessary it could go up about another six inches, and indeed on some consoles it might have to in order to avoid existing pedal pistons.
It would be nice to have it a bit smaller but at present that’s about as small as it can be due to the size of box it has to accommodate. The easiest way to reduce the overall size would be to remove the circuit box and dispense with the original AirTurn box, but that’s for another day. The plastic box is an integral part of the AirTurn design so the whole thing would need to be redesigned. In any case this has the advantage that you can still remove it and use it as originally intended.
The clamps are a little crude admittedly, so future models might have a flat end to the clamp to make them grip more effectively. It’s a journey!
I’m now off to scan the hymns in a “well known hymnbook” – all 636 of them. I may be some time!
Gavin Bateman
Update 25 Sept 2019
After using the first model of the pedal Gavin has designed and built another pedal. Here’s what he said…
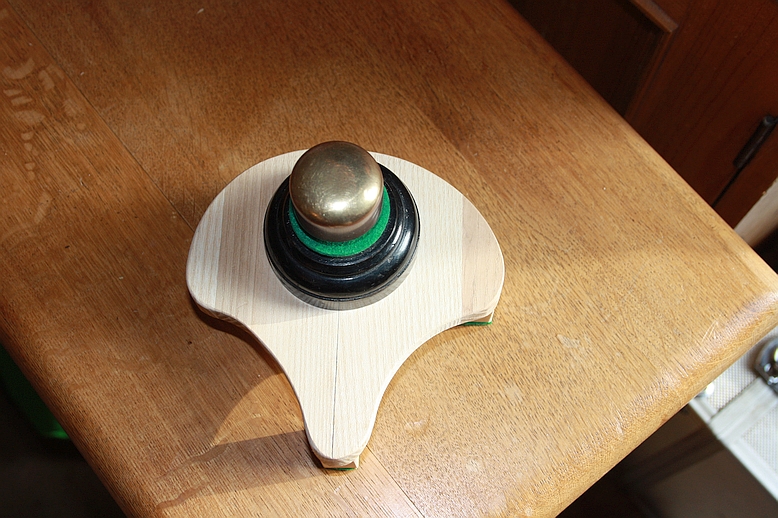
I used the foot switch for the first time in anger last Sunday morning and it was OK. At the time I it was perfect for my instrument at home but not necessarily quite the ideal answer for many instruments so I built another one which is a different shape (pic attached) which just rests between the existing pedal combinations as you can see.
This just plugs into the original with a long phono lead and I used it for an evensong a couple of weeks ago. If I’m honest it worked better than expected and is probably more likely to be a universal answer to the problem than trying to clamp something onto an unknown console!
However I’ve got both options now so I’m a happy bunny.
Update 15th November 2019
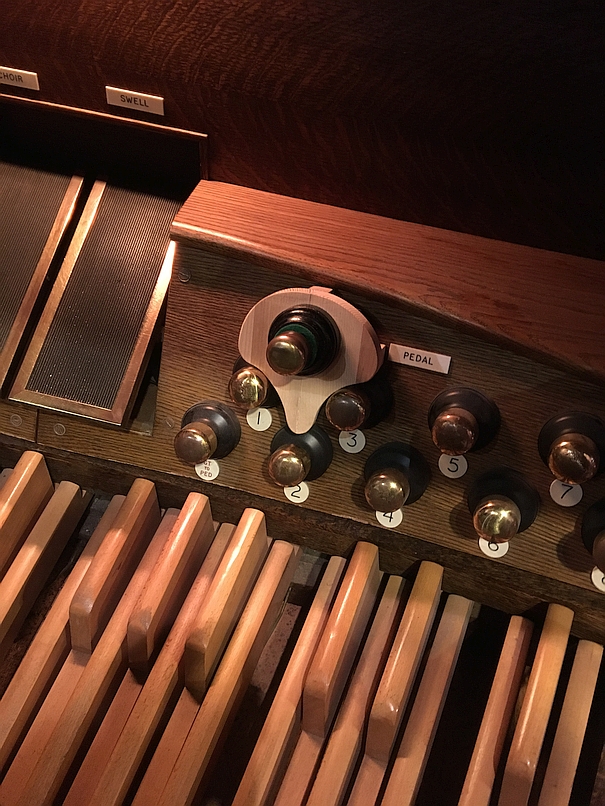
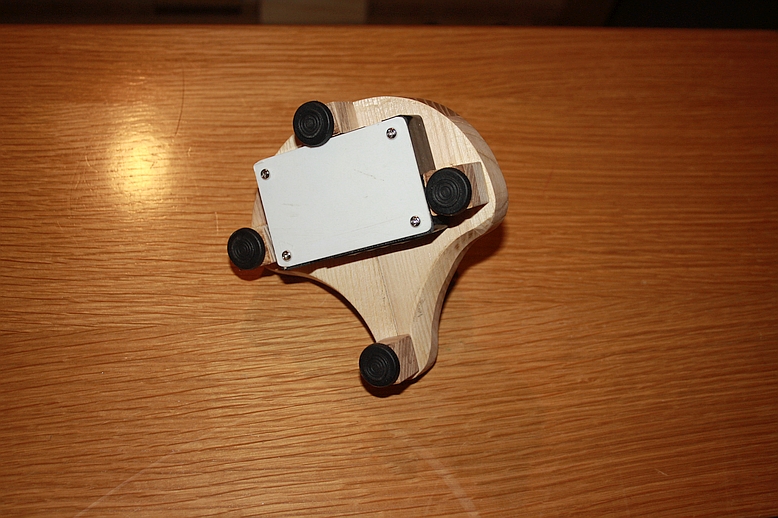
I’ve discovered after playing several different instruments in the intervening months that although ideal for my home instrument, the original wedge-shaped design (the Mk 1) was not as successful as I’d hoped as a general fit for other organ consoles.
However, the attachment which plugged into it (the Mk II) which I had originally thought of as a “stop-gap” in case the Mk 1 didn’t fit, turned out to be far more suited to use with other consoles as a general fit so I set about designing the ‘Mk III’ which is a wireless version of the Mk II.
I needed a much smaller box for the electronics so I contacted the manufacturers in Colorado and asked if they could supply me with an Airturn unit minus the box (expecting the answer No!) but the helpful chap said they already do just that. He sent me a link to their online shop and I ordered exactly what I needed.
I chose to make the Mk III base out of oak as it would be harder wearing than pine and while I was at it decided to make two.
As mentioned before a lot of this was trial and error – it’s sometimes quite difficult to visualise exactly how everything will fit together without having all the pieces first.
For example, once I’d assembled everything loosely I discovered that the circuit board underneath was too near the plunger which operated the switch. Had I not noticed this I could have assembled the whole thing and on the very first press with my foot the plunger would have shot straight through the middle of the circuit board. I doubt that would have done it much good!
The oak base is a little thicker than the original cabled one and it sits a little higher because it has to have the box of bits underneath. However this means once in place, you’ve little chance of prodding another piston accidently with your foot. Useful!
Unexpectedly I had difficulty sourcing a small project box the right size. I eventually had to settle on one which was the correct width and height but had to cut it to the correct depth, all the time trying to keep the finished product as slim as possible.
I was going to have the switch & LED panel on the front at the bottom of the pedal switch but the ribbon cable wasn’t long enough so it went on the outside of the box underneath. This has an unexpected advantage in that the “On” blue LED is actually quite bright and flashes so it can be a bit of a distraction. This way it’s out of sight and doesn’t catch your eye.
The last thing I did to complete the project was to put adjustable feet on it – very useful if you don’t want the switch rocking on a slightly uneven surface.
Thank you for your kind comments! I’m using an HP touchscreen laptop at present but I’ve found that the screen is a little too small, so I’m saving up for a 22″ touchscreen. The HP allows for two A5 pages side-by-side which covers most hymnbooks, but really for performance music you need the ability to have two A4 sheets onscreen. It will also have the advantage of enlarging the hymn book music, very welcome for my eyesight!
Having read this blog I have made exactly the same alterations to an Airturn BT200 and connected it to a standard toe piston on my Hauptwerk organ. It works except there is a tendency for the piston to make electrical contact more than once and therefore you live with the anxiety of turning more than one page. Has anyone else dealt with this issue and found a solution?
Has anybody had any experience with this: https://ssosystems.com/flip.html
Hi Rupert
If you are using Power Music Professional you can set the time interval between registering two presses of the pedal. Go to Tools/Settings/Page turning and change the time interval. This helps with “bounce” in switch contacts.
Cheers
Gordon
I was intrigued by the AirTurn pedal (not least because it was wireless) but when I put it on the console the switches were too small and too close together to be operated accurately by the foot at a distance. Because of this there was too much possibility of pushing the wrong switch and go back a page rather than going on.


What an ingenious device! Thanks for sharing.
What monitor are you using? Brand/Model.
This is wonderful and needed.
Thank you for your kind comments! I’m using an HP touchscreen laptop at present but I’ve found that the screen is a little too small, so I’m saving up for a 22″ touchscreen. The HP allows for two A5 pages side-by-side which covers most hymnbooks, but really for performance music you need the ability to have two A4 sheets onscreen. It will also have the advantage of enlarging the hymn book music, very welcome for my eyesight!
Are you commissionable to make me one?! iPad Pro user here, very keen to use a pedal to turn pages when I’m playing.
Having read this blog I have made exactly the same alterations to an Airturn BT200 and connected it to a standard toe piston on my Hauptwerk organ. It works except there is a tendency for the piston to make electrical contact more than once and therefore you live with the anxiety of turning more than one page. Has anyone else dealt with this issue and found a solution?
Has anybody had any experience with this: https://ssosystems.com/flip.html
Hi Rupert
If you are using Power Music Professional you can set the time interval between registering two presses of the pedal. Go to Tools/Settings/Page turning and change the time interval. This helps with “bounce” in switch contacts.
Cheers
Gordon